参考视频
非原创!!!
介绍
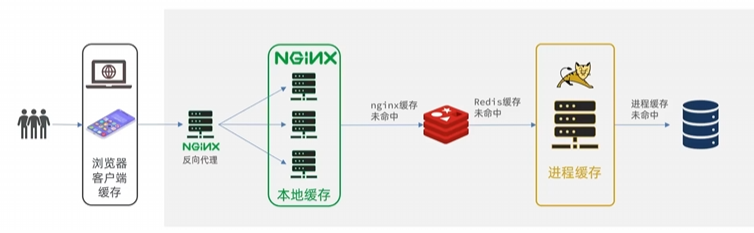
多级缓存就是充分利用请求处理的每个环节,分别添加缓存,减轻Tomcat压力,提升服务性能:
JVM进程缓存
本地进程缓存
- 缓存在日常开发中起着至关重要的作用,由于是储存在内存中,数据的读取速度是非常快的,能大量减少对数据库的访问,减少数据库的压力。
- 我们把缓存分为两类:
- 分布式缓存,例如Redis:
- 优点:储存容量更大、可靠性更好、可以在集群间共享
- 缺点:访问缓存有网络开销
- 场景:缓存数据量较大、可靠性要求较高、需要在集群间共享
- 进程本地缓存,例如HashMap、GuavaCache:
- 优点:读取本地内存,没有网络开销,速度更快
- 缺点:储存容量有限、可靠性较低、无法共享
- 场景:性能要求较高,缓存数据量较小
了解Caffeine
Caffeine是基于Java8开发的,提供了近乎最佳命中率的高性能的本地缓存库。
GitHub仓库:caffeine-可以在wiki界面中查阅官方文档
缓存使用的基本API:
1
2
3
4
5
6
7
8
9
10
11
12
13
14
15
16
17
18
19
20
21
22
| @Test
void testBasicOps() {
Cache<String, String> cache = Caffeine.newBuilder().build();
cache.put("gf", "迪丽热巴");
String gf = cache.getIfPresent("gf");
System.out.println("gf = " + gf);
String defaultGF = cache.get("defaultGF", key -> {
return "柳岩";
});
System.out.println("defaultGF = " + defaultGF);
}
|
Caffeine既然是缓存的一种,肯定需要有缓存的清除策略,不然的话内存总会有耗尽的时候。
Caffeine提供了三种缓存驱逐策略:
注意:在默认情况下,当一个缓存元素过期的时候,Caffeine不会自动立即将其清理和驱逐。而是在一次读或写操作后,或者在空闲时间完成对失效数据的驱逐。
实现JVM进程缓存
需求模拟(来自黑马)
- 利用Caffeine实现下列需求:
- 给根据id查询商品的业务添加缓存,缓存未命中时查询数据库
- 给根据id查询商品库存的业务添加缓存,缓存未命中时查询数据库
- 缓存初始大小为100
- 缓存上限为10000
首先,我们需要定义两个Caffeine的缓存对象,分别保存商品、库存的缓存数据。
在item-service的com.heima.item.config包下定义CaffeineConfig类:
1
2
3
4
5
6
7
8
9
10
11
12
13
14
15
16
17
18
19
20
21
22
23
24
25
26
27
28
| package com.heima.item.config;
import com.github.benmanes.caffeine.cache.Cache;
import com.github.benmanes.caffeine.cache.Caffeine;
import com.heima.item.pojo.Item;
import com.heima.item.pojo.ItemStock;
import org.springframework.context.annotation.Bean;
import org.springframework.context.annotation.Configuration;
@Configuration
public class CaffeineConfig {
@Bean
public Cache<Long, Item> itemCache(){
return Caffeine.newBuilder()
.initialCapacity(100)
.maximumSize(10_000)
.build();
}
@Bean
public Cache<Long, ItemStock> stockCache(){
return Caffeine.newBuilder()
.initialCapacity(100)
.maximumSize(10_000)
.build();
}
}
|
然后,修改item-service中的com.heima.item.web包下的ItemController类,添加缓存逻辑:
1
2
3
4
5
6
7
8
9
10
11
12
13
14
15
16
17
18
19
20
21
22
23
24
25
26
27
28
29
| @RestController
@RequestMapping("item")
public class ItemController {
@Autowired
private IItemService itemService;
@Autowired
private IItemStockService stockService;
@Autowired
private Cache<Long, Item> itemCache;
@Autowired
private Cache<Long, ItemStock> stockCache;
@GetMapping("/{id}")
public Item findById(@PathVariable("id") Long id) {
return itemCache.get(id, key -> itemService.query()
.ne("status", 3).eq("id", key)
.one()
);
}
@GetMapping("/stock/{id}")
public ItemStock findStockById(@PathVariable("id") Long id) {
return stockCache.get(id, key -> stockService.getById(key));
}
}
|
Nginx缓存
Lua语法
Nginx编程需要用到Lua语言,因此我们必须先入门Lua的基本语法。
官方文档
语法参考菜鸟教程
实现多级缓存
安装OpenResty
OpenResty® 是一个基于 Nginx的高性能 Web 平台,用于方便地搭建能够处理超高并发、扩展性极高的动态 Web 应用、Web 服务和动态网关。具备下列特点:
具体实现
参考文章:https://blog.csdn.net/qq_58299462/article/details/147424817
TODO 以后会写完的
缓存同步策略
大多数情况下,浏览器查询到的都是缓存数据,如果缓存数据与数据库数据存在较大差异,可能会产生比较严重的后果。
所以我们必须保证数据库数据、缓存数据的一致性,这就是缓存与数据库的同步。
缓存数据同步的常见方式有三种:
设置有效期:给缓存设置有效期,到期后自动删除。再次查询时更新
- 优势:简单、方便
- 缺点:时效性差,缓存过期之前可能不一致
- 场景:更新频率较低,时效性要求低的业务
同步双写:在修改数据库的同时,直接修改缓存
- 优势:时效性强,缓存与数据库强一致
- 缺点:有代码侵入,耦合度高;
- 场景:对一致性、时效性要求较高的缓存数据
**异步通知:**修改数据库时发送事件通知,相关服务监听到通知后修改缓存数据
- 优势:低耦合,可以同时通知多个缓存服务
- 缺点:时效性一般,可能存在中间不一致状态
- 场景:时效性要求一般,有多个服务需要同步
而异步实现又可以基于MQ或者Canal来实现:
1)基于MQ的异步通知:
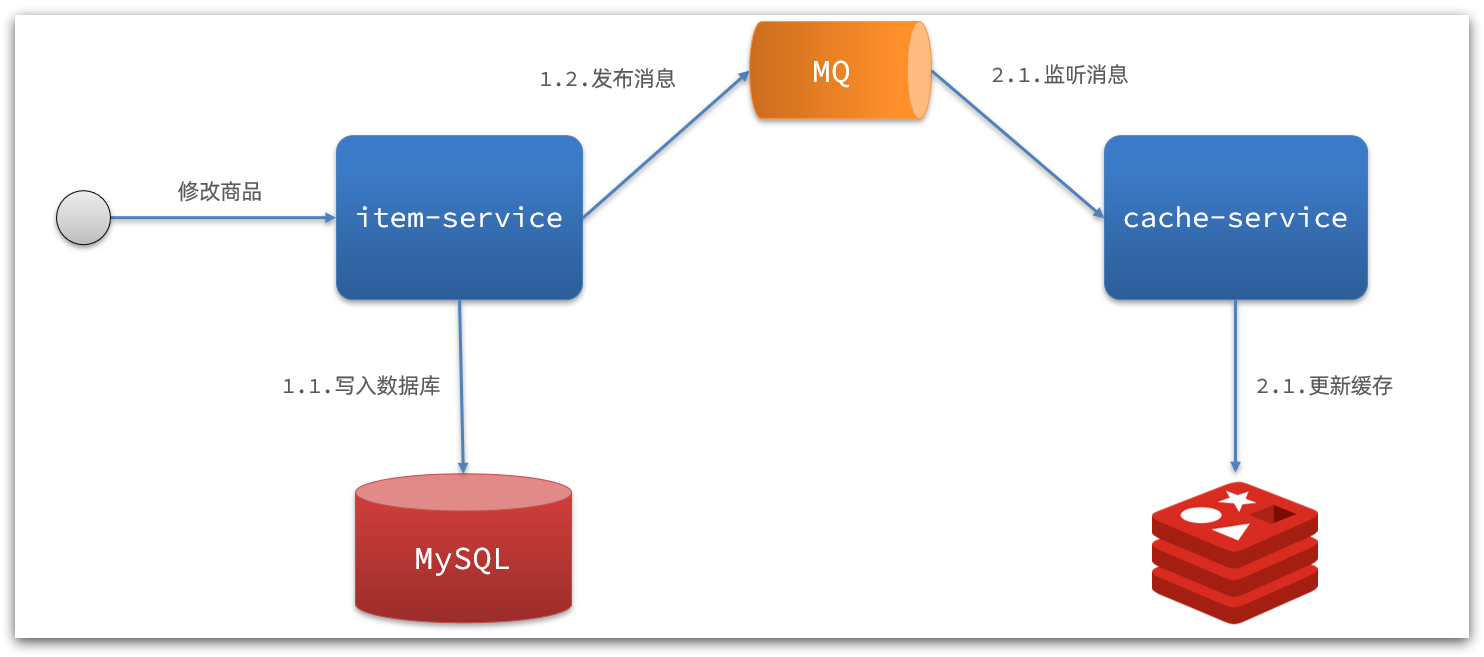
解读:
- 商品服务完成对数据的修改后,只需要发送一条消息到MQ中。
- 缓存服务监听MQ消息,然后完成对缓存的更新
依然有少量的代码侵入。
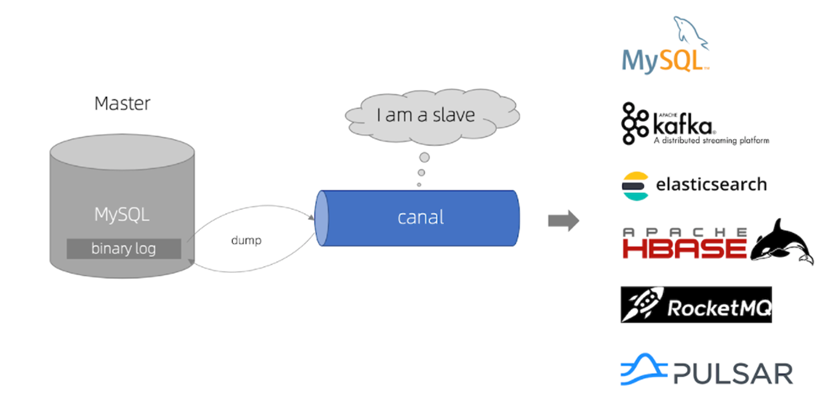
2)基于Canal的通知
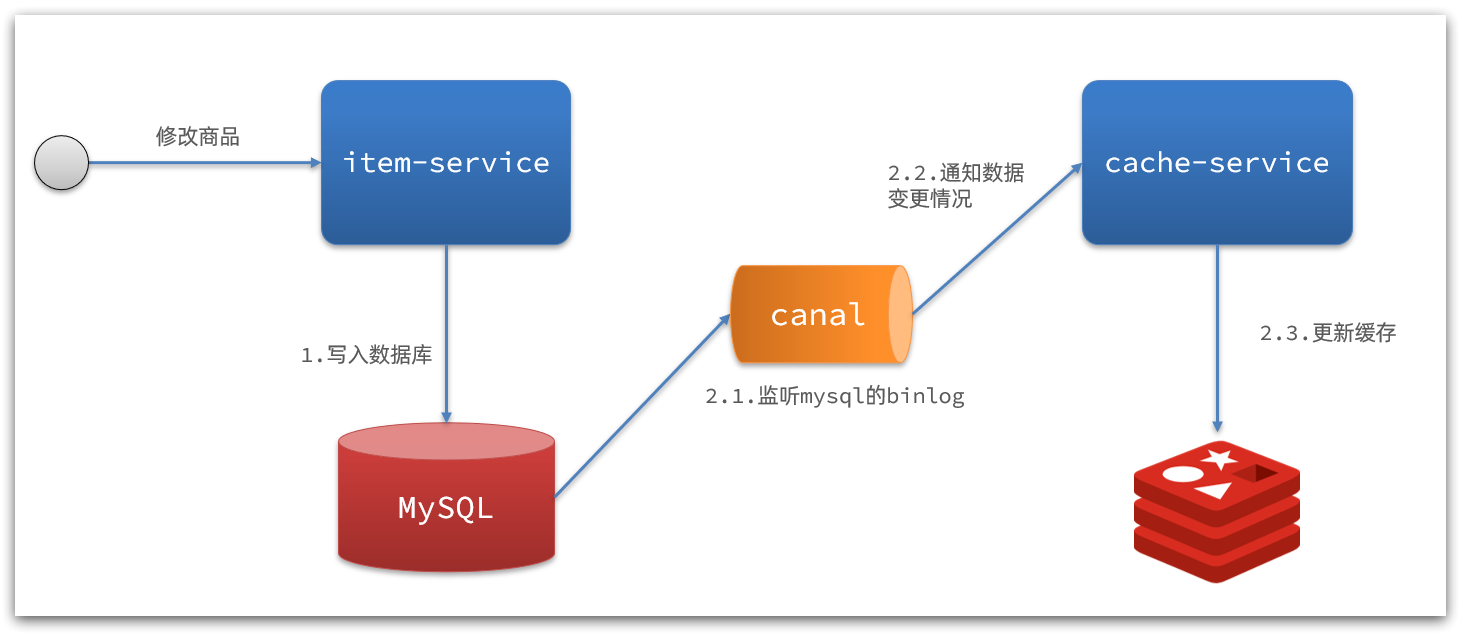
解读:
- 商品服务完成商品修改后,业务直接结束,没有任何代码侵入
- Canal监听MySQL变化,当发现变化后,立即通知缓存服务
- 缓存服务接收到canal通知,更新缓存
代码零侵入
安装Canal
认识Canal
Canal [kə’næl],译意为水道/管道/沟渠,canal是阿里巴巴旗下的一款开源项目,基于Java开发。基于数据库增量日志解析,提供增量数据订阅&消费。GitHub的地址:https://github.com/alibaba/canal
Canal是基于mysql的主从同步来实现的,MySQL主从同步的原理如下:
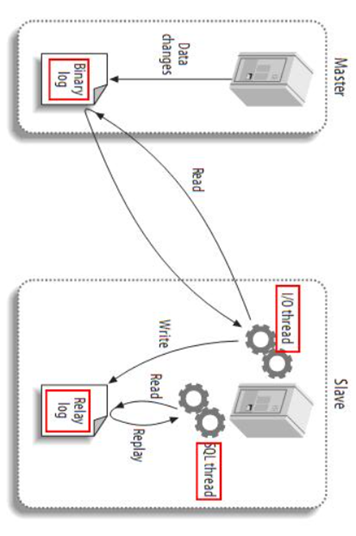
- 1)MySQL master 将数据变更写入二进制日志( binary log),其中记录的数据叫做binary log events
- 2)MySQL slave 将 master 的 binary log events拷贝到它的中继日志(relay log)
- 3)MySQL slave 重放 relay log 中事件,将数据变更反映它自己的数据
而Canal就是把自己伪装成MySQL的一个slave节点,从而监听master的binary log变化。再把得到的变化信息通知给Canal的客户端,进而完成对其它数据库的同步。
安装Canal
GitHub仓库: https://github.com/alibaba/canal
监听Canal
Canal提供了各种语言的客户端,当Canal监听到binlog变化时,会通知Canal的客户端。
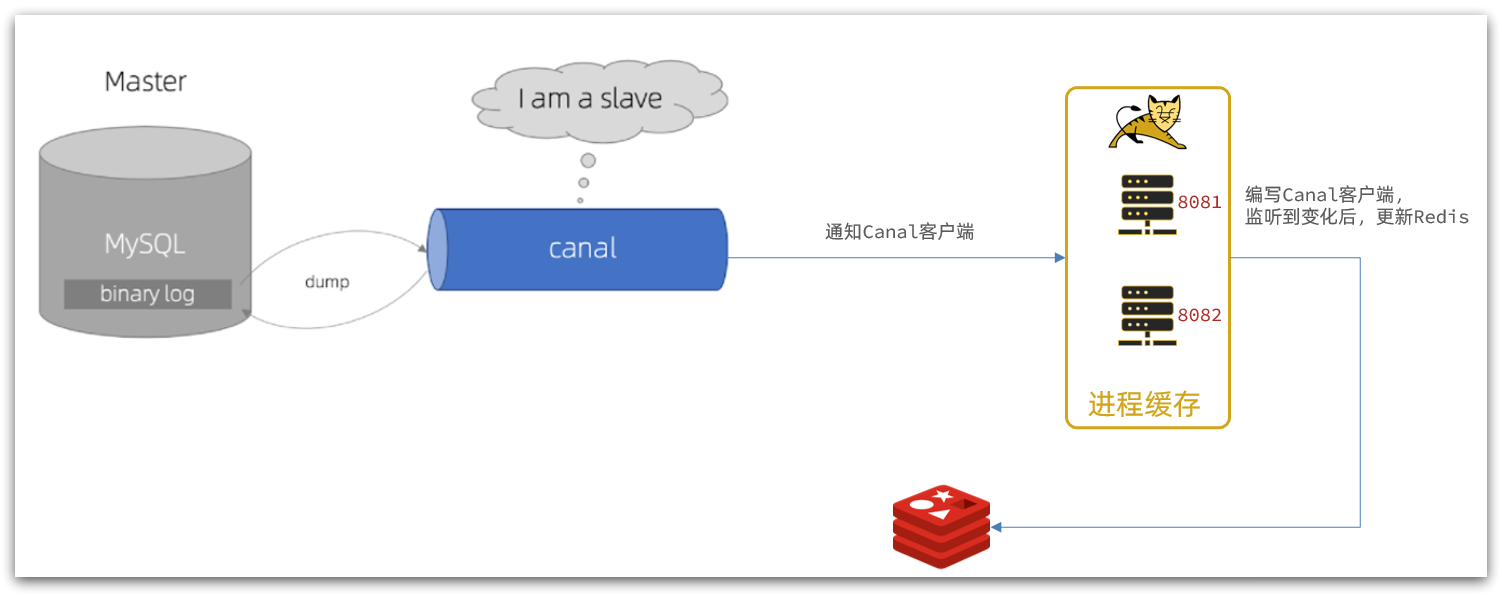
我们可以利用Canal提供的Java客户端,监听Canal通知消息。当收到变化的消息时,完成对缓存的更新。
不过这里我们会使用GitHub上的第三方开源的canal-starter客户端。地址:https://github.com/NormanGyllenhaal/canal-client
与SpringBoot完美整合,自动装配,比官方客户端要简单好用很多。
引入依赖:
1
2
3
4
5
| <dependency>
<groupId>top.javatool</groupId>
<artifactId>canal-spring-boot-starter</artifactId>
<version>1.2.1-RELEASE</version>
</dependency>
|
编写配置:
1
2
3
| canal:
destination: xiajibaxie
server: 192.168.150.101:11111
|
修改实体类
通过@Id、@Column、等注解完成实体与数据库表字段的映射:
黑马eg:
1
2
3
4
5
6
7
8
9
10
11
12
13
14
15
16
17
18
19
20
21
22
23
24
25
26
27
28
29
30
31
32
33
34
35
36
37
| package com.heima.item.pojo;
import com.baomidou.mybatisplus.annotation.IdType;
import com.baomidou.mybatisplus.annotation.TableField;
import com.baomidou.mybatisplus.annotation.TableId;
import com.baomidou.mybatisplus.annotation.TableName;
import lombok.Data;
import org.springframework.data.annotation.Id;
import org.springframework.data.annotation.Transient;
import javax.persistence.Column;
import java.util.Date;
@Data
@TableName("tb_item")
public class Item {
@TableId(type = IdType.AUTO)
@Id
private Long id;
@Column(name = "name")
private String name;
private String title;
private Long price;
private String image;
private String category;
private String brand;
private String spec;
private Integer status;
private Date createTime;
private Date updateTime;
@TableField(exist = false)
@Transient
private Integer stock;
@TableField(exist = false)
@Transient
private Integer sold;
}
|
编写监听器
通过实现EntryHandler<T>接口编写监听器,监听Canal消息。注意两点:
- 实现类通过
@CanalTable("tb_item")指定监听的表信息
- EntryHandler的泛型是与表对应的实体类
1
2
3
4
5
6
7
8
9
10
11
12
13
14
15
16
17
18
19
20
21
22
23
24
25
26
27
28
29
30
31
32
33
34
35
36
37
38
39
40
41
42
43
| package com.heima.item.canal;
import com.github.benmanes.caffeine.cache.Cache;
import com.heima.item.config.RedisHandler;
import com.heima.item.pojo.Item;
import org.springframework.beans.factory.annotation.Autowired;
import org.springframework.stereotype.Component;
import top.javatool.canal.client.annotation.CanalTable;
import top.javatool.canal.client.handler.EntryHandler;
@CanalTable("tb_item")
@Component
public class ItemHandler implements EntryHandler<Item> {
@Autowired
private RedisHandler redisHandler;
@Autowired
private Cache<Long, Item> itemCache;
@Override
public void insert(Item item) {
itemCache.put(item.getId(), item);
redisHandler.saveItem(item);
}
@Override
public void update(Item before, Item after) {
itemCache.put(after.getId(), after);
redisHandler.saveItem(after);
}
@Override
public void delete(Item item) {
itemCache.invalidate(item.getId());
redisHandler.deleteItemById(item.getId());
}
}
|
在这里对Redis的操作都封装到了RedisHandler这个对象中,是我们之前做缓存预热时编写的一个类,内容如下:
1
2
3
4
5
6
7
8
9
10
11
12
13
14
15
16
17
18
19
20
21
22
23
24
25
26
27
28
29
30
31
32
33
34
35
36
37
38
39
40
41
42
43
44
45
46
47
48
49
50
51
52
53
54
55
56
57
58
59
60
61
62
63
64
65
| package com.heima.item.config;
import com.fasterxml.jackson.core.JsonProcessingException;
import com.fasterxml.jackson.databind.ObjectMapper;
import com.heima.item.pojo.Item;
import com.heima.item.pojo.ItemStock;
import com.heima.item.service.IItemService;
import com.heima.item.service.IItemStockService;
import org.springframework.beans.factory.InitializingBean;
import org.springframework.beans.factory.annotation.Autowired;
import org.springframework.data.redis.core.StringRedisTemplate;
import org.springframework.stereotype.Component;
import java.util.List;
@Component
public class RedisHandler implements InitializingBean {
@Autowired
private StringRedisTemplate redisTemplate;
@Autowired
private IItemService itemService;
@Autowired
private IItemStockService stockService;
private static final ObjectMapper MAPPER = new ObjectMapper();
@Override
public void afterPropertiesSet() throws Exception {
List<Item> itemList = itemService.list();
for (Item item : itemList) {
String json = MAPPER.writeValueAsString(item);
redisTemplate.opsForValue().set("item:id:" + item.getId(), json);
}
List<ItemStock> stockList = stockService.list();
for (ItemStock stock : stockList) {
String json = MAPPER.writeValueAsString(stock);
redisTemplate.opsForValue().set("item:stock:id:" + stock.getId(), json);
}
}
public void saveItem(Item item) {
try {
String json = MAPPER.writeValueAsString(item);
redisTemplate.opsForValue().set("item:id:" + item.getId(), json);
} catch (JsonProcessingException e) {
throw new RuntimeException(e);
}
}
public void deleteItemById(Long id) {
redisTemplate.delete("item:id:" + id);
}
}
|