
Vue框架相关(1)
参考视频1天搞定SpringBoot+Vue全栈开发
vue前端框架,没有介绍
MVVM模式
- Model-View-ViewModel,一种基于前端开发的框架模式,其核心是提供对View和ViewModel的双向数据绑定
- Vue提供了MVVM风格的双向数据绑定,核心是MVVM中的VM,也就是ViewModel,其负责连接VIEW和Model,保证视图和数据的一致性

快速上手
建议使用按照官方文档来
1 |
|
基础使用
内容渲染
- 通过vue的模板语法
1
<p>{{username}}</p>
- 通过
v-html=""渲染成html形式:
1 |
|
属性绑定
当我们想把内容渲染到属性里面的时候,就需要用到属性绑定
1 |
|
使用JavaScript表达式
1 | <div id="app"> |
注意:这里不要写语句,只能是表达式或者变量
事件绑定
1 |
|
条件渲染指令
- 用
v-if控制渲染条件 - 用
v-show控制渲染条件
1 |
|
二者差异
v-if如果是false,那么不会被创建v-show如果是false, 创建后通过css的style="display:none"隐藏频繁切换时候,v-show更好
v-if和v-else-if指令
1 | <div id="app"> |
v-else-if同理,不多赘述
列表渲染指令
1 |
|
v-for中的key
这里举一个添加用户的例子
1 |
|
当不加key的时候,勾选标签再添加就会出现bug,此时就需要添加key
1 | <li v-for="(user,index) in userlist" :key="user.id"> |
注意,key不可以是index,其数值实时变化,依然解决不了问题
NPM的使用
概述
NPM(Node Package Manager)是一个NodeJS包管理和分发工具- 其优秀的依赖管理机制和庞大的用户群体,目前已经发展成为整个JS领域的依赖管理工具
- 最常见的用法就是用于安装和更新依赖。要使用
NPM,首先要安装Node工具
使用
- NodeJS安装地址-Node包含了NPM包管理工具
- 常见指令
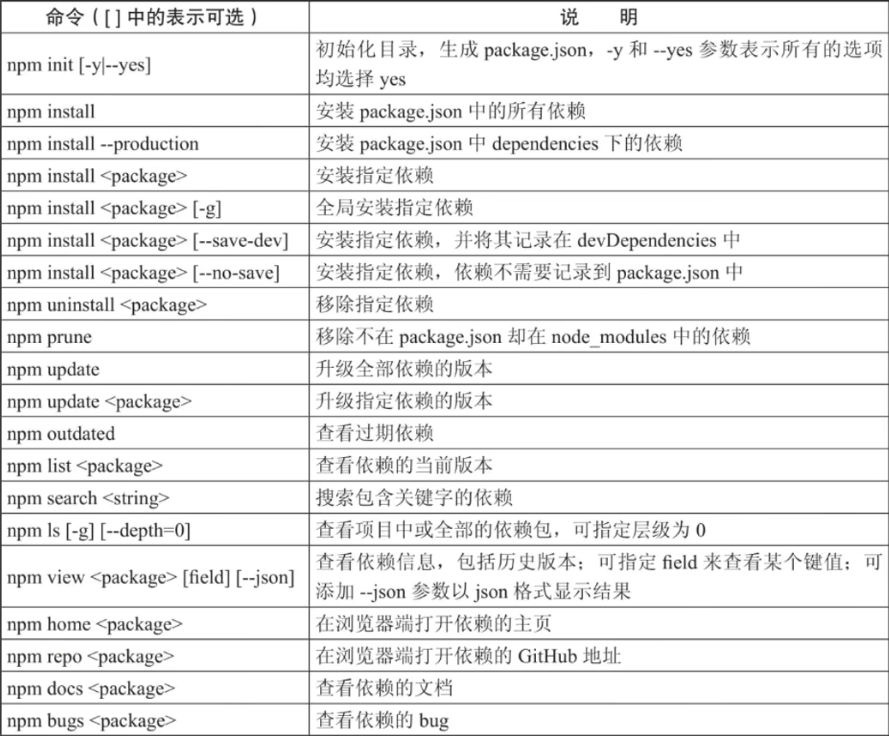
最主要的就是npm install
Vue CLI的使用
- 是Vue官方提供的构建工具,通常称为脚手架
- 用于快速搭建一个带有热重载以及构建生成版本等功能的单页面应用
Vue CLI基于webpack构建,也可以通过项目内的配置文件进行配置- 安装:
npm install -g @vue/cli安装时,在你想要开发项目的文件夹下打开cmd安装
选错的时候,ctrl+c可以重来
- 创建项目:
vue create your_project
学习时脚手架安装推荐
Manually select features->Babel->3.x->In package.json->N(不用快照)
组件化开发
组件(Component)的构成
- 规定组件的后缀名是
.vue - 每个
.vue组件都由3个部分组成:template,组件的模板结构,可以包含HTML标签以及其他组件script,组件的JavaScript代码,导入组件也在这里style,组件的样式
了解架构
package.json:- 如果设置
private:true就不会发布到npm上 serve:默认vue-cli-service serve,运行指令
- 如果设置
src:写代码的目录main.js:入口文件
App.vue:Vue提供的根组件components:所有组件都写到这个底下封装,可复用
运行
- 在vscode中打开文件夹,打开终端(也可以在文件下目录下打开cmd)
- 输入
npm run serve,这个serve就是上文中的运行指令 ctrl+c可以关闭
导入其他组件到App.vue中
1 | <script> |
使用其他组件
1 | <template> |
实际上就是把其他组件变成标签去使用了
本博客所有文章除特别声明外,均采用 CC BY-NC-SA 4.0 许可协议。转载请注明来源 Blog of Sof!
相关推荐

2025-12-11
Axios网络请求
文章参考来源Axios网络请求 Axios了解简介 Axios是基于promise网络请求库(基于AJAX的网络请求框架),作用于node.js和浏览器中 Axios在浏览器端使用XMLHttpRequests发送网络请求,并能自动完成JSON数据的转换 安装官网地址:更多安装方式以及教程参考官方文档 npm安装: 1npm install axios 导入import axios form 'axios' 可以全局导入也可以哪个组件用哪里导入,注意axios导入和正常写路径不同 发送网络请求发送GET请求 方法一:在axios方法中直接传入一个对象,配置请求路径:url,传递参数:params。然后使用。.then方法获得响应数据 1234567891011121314151617//配置接口地址axios.defaults.baseURL = 'http://127.0.0.1:3000'function testget() { axios({ ...

2025-12-23
跨域认证
参考视频 Session认证提要互联网用户认证的一般流程: 用户向服务器发送用户名和密码 服务器验证通过后,在当前对话(session)里面保存相关数据,比如用户角色、登陆时间等。 服务器向用户返回一个session_id,写入用户的Cookie 用户随后的每一次请求,都会通过Cookie,将session_id传回服务器 服务器收到session_id,找到前期保存的数据,由此得知用户的身份 Session的问题与解决方案session认证扩展性不好,如果是服务器集群,或者是跨域的武器导向架构,就要求session数据共享,每台服务器都能够读取session,针对这种问题一般有两种方案: session数据持久化,写入数据库或者别的持久层。各种服务收到请求后,都向持久层请求数据。这种方案的优点是架构清晰,缺点是工程量比较大 服务器不再保存session数据,所有数据都保存在客户端,每次请求都发回服务器。Token认证就是这种方案的代表 Token认证是服务器产生的一串字符串,是客户端访问资源接口(API)时所需要的资源凭证,流程如下: 客户端使用用户名跟密码请求登...

2025-12-11
前端数据模拟mockjs
参考视频戳我跳转 mockjs介绍 Mock.js是一款开发中拦截Ajax请求再生成随机数据响应的工具,可以用来模拟服务器响应 优点是非常简单方便,无入侵性,基本覆盖常用的接口数据类型 支持生成随机的文本、数字、布尔值、日期、邮箱、链接、图片、颜色等 安装:npm install mockjs 官方文档 基本使用 在项目中创建mock目录,新建index.js文件 12345678910111213141516171819import Mock from 'mockjs'Mock.mock('/product/search', { "ret": 0, "data": { //随机生成日期时间 "mtime: "@datetime", //随机生成1-800的数字 "score|1-800": 800, //随机生成1-100的数字 ...

2025-12-11
Vue框架相关(2)
如何使用别人的vue项目 通常情况网上下好的vue开源项目都是不包含node_modules文件的 这个时候只需要打开npm i一下,就会自动读取package.json中的记录下好依赖 第三方组件element-ui3.0版本官网 居然是饿了么提供的开源前端框架 安装 安装:npm install element-plus --save 快速开始: 完整导入:如果你对打包后的文件大小不是很在乎,那么使用完整导入会更方便。1234567import { createApp } from 'vue'import ElementPlus from 'element-plus'import 'element-plus/dist/index.css'import App from './App.vue'const app = createApp(App)app.use(ElementPlus)app.mount('#app') app.use(ElementPl...

2025-12-11
HTTP基础+分层解耦
注意:大部分截图来自黑马 ,仅个人学习使 HTTP协议 请求协议 请求数据格式 请求行 (请求方式、资源路径、协议) get方式:路径中可以携带参数,请求大小在浏览器当中是有限制的 post方式:请求参数在请求体当中,请求大小没有限制 请求头(key:value) Host:请求的主机名、eg:localhost:8080 User-Agent:浏览器版本 Accept:表示浏览器能接受的资源类型,如text/*,image/*或者*/*表示所有 Accept-Language:表示浏览器偏好的语言,服务器可以据此返回不同语言的网页 Accept-Encoding:表示浏览器可以支持的压缩类型,例如gzip,deflate,br等 Content-Type:请求主题的数据类型 Content-Length:请求主题的大小(单位:字节) 请求体:POST请求,存放请求参数 请求数据的获取(调用HttpServletRequeest)–通常AI 获取请求方式 1String method = request.getMethod();//GET 获取请求的url...

2025-12-11
JDBC-MyBatis简单入门
JDBC 简单了解,非重点 本质就是一套规范、接口,实际运行需要引入驱动(jar包) 操作步骤 1234567891011121314// 1.注册驱动Class.forName(className:"com.mysql.cj.jdbc.Driver");// 2.获取连接String url = "jdbc:mysql://localhost:3306/localpackage";String username = "root";String password = "1234"Connection connection = DriverManager.getConnection(url, username, password)// 3.获取SQL语句执行对象Statement statement = connection.createStatement();// 4.执行SQL// 语句书写// 5.释放资源statement.close();connection.close(); 执行DQL语句...
评论